Friday, May 27, 2011

Villa Paola


My mom and I work for some Italian artist here on Maui and they often have visitors to their home where they have a beautiful cottage that is decorated with their art as well as all the charm of Hawaii and Italy. Their art is exquisite! You can meet them here at their website Twins Fine Art.

They asked me to create a welcome package for the visitors that come, something that reflects Hawaii and the Villa as well. 

Photo Courtesy of Villa Paola Maui
This plaque is hanging right on the wall as you enter the outdoor area of the cottage. As you can see it is pretty detailed and beautiful. It was pretty impossible to exactly match the design on the border so I instead used the marbling technique with similar colors in the corresponding areas.


 Being that the Twins are artist, I was a little nervous to show them the cookies but they loved them and one of them even called the cookies, "Little Works of Art" :)

So, if you plan on visiting Villa Paola any time soon, you can expect some sugarHI creations too!

Wednesday, May 25, 2011

Microsoft Office


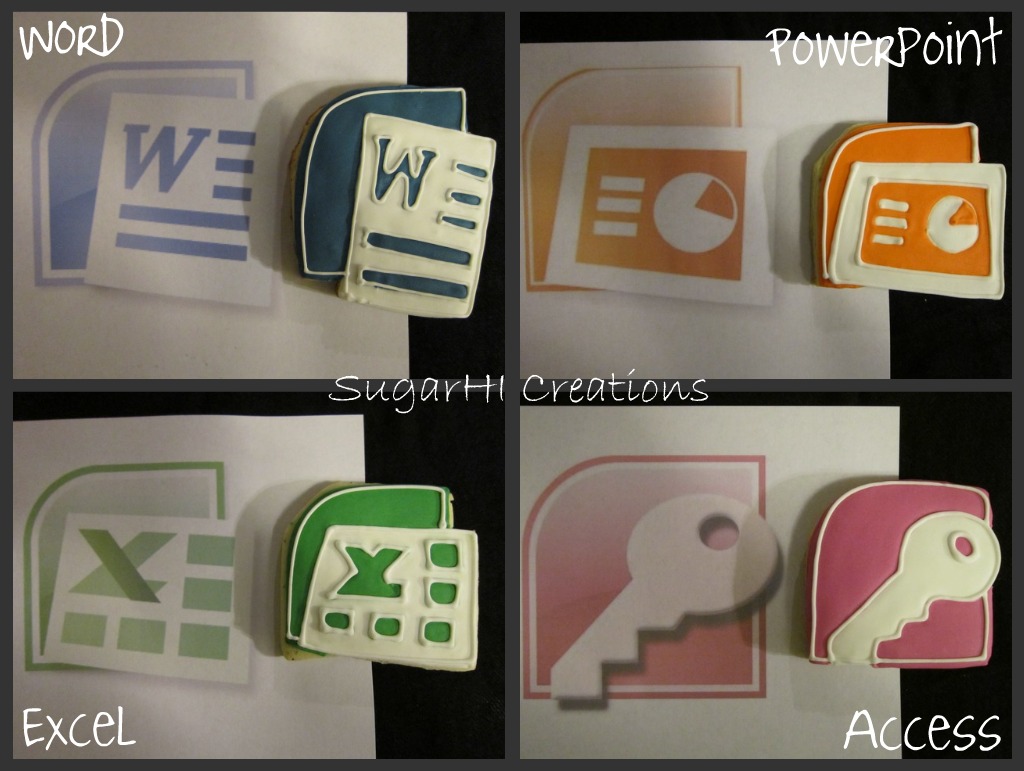
Here they are! This is the other set that Rhonda asked us to create for her business students, 4 of the logos from Microsoft Office...Word, Excel, Powerpoint and Access. These were a bit of a challenge but we were so happy with the results...and so was she!

Initially when we looked over the logos and were trying to figure how to create them in cookie form, I figured maybe we should just make squares and just do the inner part of the design forgoing the outside color border. But Anjell said, 'We can do it!" We sketched  and tried different thing and in the end it worked! Anjell made stencils of each logo and got to baking. She hand cut each and every cookie...no premade cookie cutters for this batch!


Then we got to work mixing colors, trying to match them best we could. Mixing colors is an interesting science and requires much patience at times. Often it takes quite some time to let the colors develop and many times they turn into something completely different than what you were going for. In the case of these colors, it took some time but thankfully, the colors developed and dried to the perfect shades we were looking for. 

Here are the finished products side by side with the actual logos we based them off of...


Pretty good huh?!  
These took an all night session, decorating till about 6 am, but it was worth it. We were able to not only push ourselves to create something great but had a very happy, satisfied customer! Once the finishing touches were applied and dried, such as the white border that really pulled them together and made them look like a complete set, we packed them up and delivered them the next morning about an hour before the first class was to start.


Rhonda loved them! In fact heres a picture she took of the cookies in her class....


This was a fun, challenging, rewarding set to make. We learned a lot and feel like it help us to grow and also gave us a little more confidence to just go for it! 

We've been busy, busy this week...with orders and projects so stayed tuned for more posts soon :) Thanks again for visiting and for all the support!!


Monday, May 23, 2011

"E" is for Eli!


This is Eli! How cute is this little man!? He is my cousin and I just adore him!
(Ok, so I haven't actually "met" him in person, cause my cousins live in the mainland...but...I adore him anyways!!!)

My husband was heading to their area with the band Ekolu (remember those cookies?), and so I baked up a batch of goodies for him to take to the family there. Of course Eli needed his own special couple of cookies :)


 Eli LOVED his cookies! In fact, my cousins said that his favorite word for the next few days was "cookie"! And as a bonus his Mommy sent me some adorable pictures of him enjoying them and I am going to share them with you because they are too cute to keep to myself!

Here he is checking them out...he takes his cookies very seriously!


And here he is enjoying those cookies!! "Cookie Monster"!


Of course he did share a few with his Mommy and Daddy and I also sent a sent for my Aunty and for my other cousin and his wife.


Everyone loved them and I am glad that I was able to use the opportunity to send some sugarHI love to my far away family :)

Friday, May 20, 2011

BUSN 170

Lemon Poppy Seed with Royal Icing. These weren't the "prettiest" cookies I have ever made so they deserved a "pretty"platter to take a picture on :)


Rhonda, a friend of mine since I was very young, is a teacher at the local college here and contacted us to do End of the Semester cookies for her students as gifts. She teaches various business classes there and the first set she asked us for were filing cabinets for her records management class. How creative is that idea?! 

I got to work trying to figure out just how to create a filing cabinet cookie...and this is what I ended up with.


Because I don't have a rectangle cutter, I used a square side by side to make a gentle impression on the dough. Then I used the handy mini roll cutter that I got on a trip to Oahu to cut out the rectangles. This was the first time I actually used this tool and it worked perfectly for this occasion. Not only did I get a perfect rectangle but I also got a great guide line baked right onto the cookie from the impression of the square cutter to make sure my piped squares were actual squares!

Funny thing is, when I first looked at the color of the cabinet I had chosen, I though that's an easy color to make, better than gray or black that I'd have to make ahead and then let sit to develop. But, it actually took a while for me to get the shade just right. In the end I was very pleased with the result.

I flooded in stages to add dimension to the look of the icing. This is a tip I picked up from Callye. (I told you she was my cookie idol!) Once each stage dried and I had the whole thing covered, I added the details like the handles and the little lock in the top corner and used the class name BUSN 170 as the labels on the drawers. 


I sent a picture of them to Anjell when I was done and she loved them and could recognize them as filing cabinets and then showed them to my mom and she too knew what they were so I knew I was safe...lol!! I think sometimes you have a vision of a cookie in your head and then stare at it so long while you are making them that you need some fresh eyes to reassure you :)

I delivered these to Rhonda the day before the class and she was so happy with them. She mentioned later to me that many in the class didn't want to want to eat them because they were too cool to look at! In fact one student started to nibble on the cookie and was told by another..."What are you doing?! You are not supposed to eat them!" She wrapped it back up and put it on the side but did say it was very yummy!!

Yes, friends...we do encourage you to EAT the cookie!! Not only are they pretty but they do taste pretty awesome is we do say so ourselves...LOL!! 

This was a fun set to do....but Rhonda had one more in mind for her other classes. Stayed tuned to see those real soon!!


Wednesday, May 18, 2011

Teacher Appreciation Week...

...was May 2-6! I know, kinda late on this post, but don't worry the teachers got their gifts ON TIME!! 
Found these great Teacher Appreciation Week printable tags done by
Beth of "It is what it is"
thru Callye from "The Sweet Adventures of Sugarbelle" along with Callye's awesome cookies and was inspired! Now, I'm no Callye (my cookie idol...by the way :), but I did make an attempt at recreating her adorable apple cookie and added a "Thank You" with a food writer. What's better than an apple for a teacher?!

Maybe some Gold Stars!! "A+ Super!" Gold Stars that is :)


Combined with my kids and Anjell's son, there were 10 very happy sugarHI-ed teachers! Thanks to all you awesome teachers out there past and present that devote your time and energy to educate so many kids!! You deserve more than just one week of appreciation!!


Tuesday, May 17, 2011

Heartfelt Expressions........

Love is.............

Well, it's been so long you probably forgot... but here FINALLY, are the wedding cookies for my 
brother's wedding. (refer to post of my sis-in-laws bridal shower cookies).

Inspired by one of many beautiful sets by Haniela, (just click her name for a link to my inspiration) I fell in love with these.  Haniela added a monogram to her's, however, once I was at this point, the bride and groom loved the simplicity of them just like this.  And who was I to argue with that?! I still had the other half to do with their names and wedding date on them.  My hand was grateful....


To add a little excitement, I was finishing decorating these cookies the night of the tsunami.  We were safe where we were, but my husband was on another island, the wedding was in two days and the sirens were going off all through the night! The adrenaline from it all made it difficult to have a steady hand.... 
good excuse, huh?
 

 I must say, there is extra fun in doing cookies for the ones you love.  I really enjoyed these, and they survived through a lot.  Including a plane ride from Maui to Oahu.  And my mom just mentioned that she was still eating some of this exact set of cookie leftovers just a couple weeks ago, and she said they STILL tasted great.  Fresh is best, but it's nice to know they held up well. 

The other half was personalized with their names and their wedding date, and they were adorably packaged by the bride, groom, brides mom and sisters, and my sweet HUSBAND!  Where was I? sleeping.......anyways, they were in a clear package with gray & white bakers twine and sealed with a Thank You label then alternated and laid out at each place setting on the tables.  


Well there you go, the wedding was amazing! And I'm not just being partial,  it really was a wonderful night of memories. 
(Now..... what cookies should I make for your 1 year anniversary?..............)

Congratulations JOEL & SANDY! 
Love you!

Related Posts Plugin for WordPress, Blogger...